Rhubarb Fruity Crisp

Rhubarb Fruity Crisp

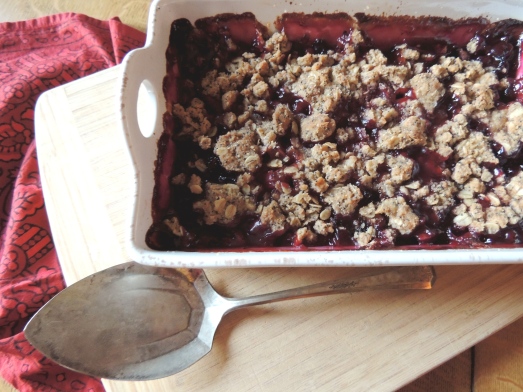
Made this crisp yesterday with fresh farmer’s market rhubarb! Since moving to Iowa City almost a year ago, this was our first experience at the IC farmer’s market. We enjoyed seeing all the vendors and the early spring produce, herb plants, and hand crafted foods. It has been so rainy here that the bugs were unbearable the entire time we were at the market. Hopefully our next visit will be gnat-less and yield even more produce!
The best part about this recipe is that it can really be adapted for any season. Mix up the fruit to reflect what is seasonal.

As much as I love the sour puckering quality of rhubarb… the crisp topping is really unbelievable. {I could eat is raw… shhh don’t tell.} This recipe is inspired by one of my favorite bloggers/ cookbook authors, Heidi Swanson. I hope you enjoy!

Rhubarb Fruity Crisp:

Crumble topping:
3/4 C. whole wheat pastry flour
2 T. poppy seeds
1/2 C. rolled oats
1/2 C. sugar
1/2 tsp. salt
1/3 C. butter, melted

Fruity filling:
1 T. cornstarch
1/3 C. sugar
1 1/2 C. rhubarb, diced
1 1/2 C. strawberries, roughly chopped
1/2 C. raspberries
1/2 C. blueberries
1/2 C. apricots
1/4 C. dried currants
1/4 C. good brandy

Preheat oven to 375 degrees. Butter a medium baking dish.
Mix the crumble ingredients until all crumbs are coated in butter and can be formed into balls. Form the crumbs into small and medium sized balls. Don’t worry if some crumbs remain. Freeze the crumbles until ready to bake.
To make the fruity filling, combine all fruit in a large bowl and stir in cornstarch and sugar. Toss fruit until coated and fruit begins to give off some of its liquid. Add the brandy and stir to coat all fruit.
Pour the fruit into the prepared baking dish and distribute the frozen crumbles evenly across the top.
Bake for 35 minutes. Let cool until juices are syrupy.
I served mine warm topped with vanilla bean ice cream.

Let me know what you think! This is my new go to crisp topping. Feel free to experiment this summer with fresh, juicy peaches and cherries. Substitute the brandy for Grand Marnier or Saint Germaine.

Try this recipe this fall or winter with tart apples, firm pears, and dried cranberries. With this combination you could substitute a nice red wine {Heidi suggests a Beaujoulais} or fruity port for the brandy. Toasted walnuts would be such a great addition.

Whole-Wheat Citrus Cherry Biscotti

1 ¼ C. whole-wheat pastry flour

½ C. all purpose flour

½ C. brown sugar

2 eggs

1 t. vanilla

1 t. baking soda

¼ t. salt

¾ C. almonds, toasted and coarsely chopped

1 C. dried cherries, coarsely chopped

zest of ½ lemon

zest of ½ orange

I did this recipe by hand without using a stand mixer but you could do either.  Preheat oven to 350 degrees.  Start by whipping the brown sugar, eggs, and vanilla until it is a bit frothy and a pale brown color. Set this mixture aside and whisk together flours, baking soda, and salt.  Slowly add dry ingredients to wet ingredients, just until combined do not over mix.  Fold in almonds, cherries, and both zests until well distributed.

The dough will probably be a bit sticky, so prepare a flour-covered counter to roll form your dough.  Roll the dough into a 12-inch log.  Then shape the log to the shape of the cookies you desire.  You can play around with different shapes, like the traditional rounded top or you could try a flat top, experiment and have fun with this part.  Place the dough log onto a parchment covered baking sheet.  Bake for 25 minutes at 350 degrees.

Take log out of the oven and let cool for about 10 minutes.  Reduce heat in oven to 325 degrees.  When cooled, slice biscotti into ¾ -1 inch pieces with a sharp knife.  Place biscotti slices cut side down on the parchment covered baking sheet.  Bake slices for 10 -12 minutes, remove from oven and flip biscottis, bake for another 10-12 minutes, or until the centers are firm.  Remove for the oven and let cool completely.  Store in an airtight container.

Makes 15-20

For this recipe I used dried bing cherries with no sugar added.  I like the earthy rich flavor of these cherries but you could experiment with all sorts of dried fruit and nut combinations.  I think apricot, almond, and lemon zest would be delicious, too.

Here is a list of other good “add-ins”:

Nuts- walnuts, pecans, pistachios

Fruit- dried apricots, cranberries, blueberries, candied ginger etc.

Chocolate chips

Espresso powder

If you are daring, try something savory and adjust the sugar level.

Let me know if you think of some cool flavor combinations or think of other add-ins.


Wrapped Salmon with Balsamic Glaze plus a side dish…. Baked Israeli Couscous

I hope you all enjoy these new recipes I created last week.  Josh was in love with the salmon and glaze but I love, love, love the baked couscous.  I was so glad we had a ton of leftovers for quick lunches and dinner after work! But an announcement is in order!!! I have taken on a new adventure… I have decided to write a cookbook.  This is one reason I have been gone for so long… I have been busy developing and photographing my own recipes.  The baked couscous will be an addition to this cookbook! I am working on designing the layout and finding a publisher. I will keep you all up to date on the progress.  I would love some feed back if you end up trying some of these recipes.    Enjoy!

Wrapped Salmon with Balsamic Glaze

Filets:

4 (5oz) salmon filets, skin removed and preferably wild caught

4 T. Dijon mustard, separated 1 T. for each filet

12 asparagus spears, par boiled

8 slices of red pepper, par boiled

8 green onions, sliced down the middle lengthwise

¼ C. basil, chiffonaded

salt & pepper

12 sheets frozen phyllo dough, thawed

olive oil

Glaze:

¾ C. balsamic vinegar

2 T. maple syrup

1 T. Dijon mustard

2 cloves garlic, minced

To begin, combine all glaze ingredients in a small saucepan and bring to a boil.  Reduce heat and simmer until thickened to desired consistency.  I like mine a little thinner so I reduced for about 10-15 minutes. Take glaze off the heat and set-aside until dinner.

Since phyllo dough can be a bit finicky it is important to have all your ingredients prepped and ready to roll before you wrap salmon.  Preheat oven to 375 degrees.  To par boil asparagus and red peppers, bring a pot of salted water to a boil, turn off heat and add vegetables to water.  After 3 minutes test the vegetables for tenderness.  If too tough keep cooking, if tender remove vegetables and immediately plunge into iced water to stop cooking.  Drain and set vegetables aside.

At this time you are ready to begin wrapping your salmon filets.  Pat each filet dry and place on one sheet of phyllo dough about 1 inch from the edge closest to you.  Top filet with dollops of Dijon mustard, salt, pepper, a sprinkle of basil, 3 asparagus spears, 2 red pepper slices, and 4 green onion halves.  Gently, roll the salmon turning in the sides (similar to a burrito).  When rolled, brush olive oil over the “salmon burrito” and set an inch from the edge of another sheet of phyllo already fully brushed with olive oil.  Repeat this until the salmon packet is wrapped with 3 sheets of phyllo.  Place on a foil lined baking sheet.  Repeat this process for each filet.  Bake for 20-30 minutes until the phyllo is crunchy and golden brown.  Remove from the oven and let cool 3-5 minutes. Slice in half on a bias and serve drizzled with the beautiful deep brown balsamic glaze.

Serves 4

This dish is wonderful served with my Baked Israeli Couscous.

Baked Israeli Couscous

2 C. Israeli Couscous

2 ½ C. water

olive oil

3 C. blend of shitake and porcini mushrooms, sliced

1 med. Shallot, chopped

2 cloves garlic, minced

½ C. beer or white wine (could also use chicken stock)

salt & pepper

2/3 C. plain Greek yogurt

3 T. whole grain mustard

10 large basil leaves, chiffonad

1 ½ tsp. dried dill

zest of ½ lemon

1 ½ C. Monterrey Jack, shredded and divided into 1 C. and ½ C.

1 ½ C. fresh green peas

½ C. pecorino Romano cheese, grated

To begin, bring 2 ½ cups of water to a boil.  Add the Israeli couscous and reduce to a simmer.  Cook until the water is absorbed and the couscous is tender, about 15 minutes but watch it closely.  Stir in about 2 tablespoons of olive oil to keep the couscous from sticking together.  Set cooked couscous aside.

Preheat oven to 375 degrees.  In a large skillet heat 2 tablespoons of olive oil over medium heat.  Add shallots and garlic, cook until fragrant and sweated down.  Be careful not to burn the garlic.  Add the blend of mushrooms and stir once.  Let mushrooms brown without stirring them because stirring will cause their juices to release and they will not brown properly.  Also, only add salt after the browning has occurred because salt will draw out the mushrooms juices too quickly.  When mushrooms are browned, add salt and pepper and deglaze with beer or white wine.  Scrape the bottom of the skillet to loosen the brown bits stuck to the skillet.  Keep on the heat until the beer has thickened a bit.

Meanwhile, in a medium bowl, combine the Greek yogurt, whole grain mustard, basil, lemon zest, 1 cup Monterrey Jack cheese, and pecorino Romano.

Add mushrooms to the yogurt dressing and stir to incorporate the juices evenly.  Add peas and couscous to the dressing.  Pour mixture into a greased baking dish and top with the remaining ½ cup of Monterrey Jack cheese.  Bake for 20-30 minutes or until heated through and cheese is golden brown and bubbly.
Baked Coconut Shrimp


Ingredients:

1 Tablespoon lime juice

2 teaspoons finely chopped fresh jalapeno pepper

1/2 cup pineapple preserves

1 pound uncooked large shrimp, peeled and deveined

2 egg whites

2 Tablespoons cornstarch

2 cups sweetened flaked coconut

Directions

Combine lime juice, jalapeno pepper, and pineapple preserves in a small bowl and mix well. Cover and refrigerate until ready to serve.

Preheat oven to 400 degrees and line a cookie sheet with parchment paper.

In a small bowl beat egg whites with a hand mixer until soft peaks form.

Place cornstarch and coconut on two separate plates. Hold shrimp by the tail and dip and coat the shrimp with cornstarch. Next, dip the shrimp in the egg whites and finally in the coconut coating well.

To serve:  I served my coconut shrimp with the spicy pineapple sauce and my version of mock grits. To make the dish a bit healthier for a week night meal, I made up a dish I call mock grits.

Mock Grits:

1 head of cauliflower

water

1/4 C. fresh grated Parmesan cheese

salt & fresh cracked pepper

Cut up cauliflower into small florets. Boil in salted water until extremely soft. Remove cauliflower from extra water and puree in food processor or with immersion blender until slightly “gritty”. When blended to desired consistency stir in Parmesan cheese, salt, and pepper.

These mock grits could be used as a side dish for a number of different dishes. I think they would be great with sharp white cheddar instead of Parmesan.  Top them with bbq shrimp! YUM

Butternut Squash Falafel

This recipe was inspired by a sweet potato falafel recipe I saw for the first time on my favorite food blog 101cookbooks.com.  Since butternut squash is in season and I had a whole ton to use up I decided to change up the recipe and try something a lil different. Be sure to season the falafel batter very well otherwise these can be quite boring and bland. This whole recipe is super healthy and delicious. I hope you enjoy!

Butternut Squash Falafel

½ roasted, pureed butternut squash

1 C. whole wheat flour

½ C. cilantro

1 ½ tsp. cumin

1 ½ tsp. coriander

1 ½ tsp. smoked chili powder

1 T. lemon

¼ C. fresh basil

Salt & Pepper!

Sesame seeds, white and black (optional)

Combine all ingredients and let cool 20 minutes.

Scoop batter into 1-2 inch balls and arrange on parchment lined baking sheet. Sprinkle with black and white sesame seeds. Bake at 400 degrees for 15-20 minutes.

To serve: I loved these cute falafel balls as a homemade gyro style sandwich. Super tasty and fresh.

Put 2 butternut squash falafel balls in a warmed whole wheat pita with homemade tzatziki sauce, tomato wedges, red onion slices, and sliced cucumbers.

Homemade Tzatziki sauce:

1 container plain Greek yogurt

¼ C. chopped English cucumber

1 T. fresh lemon juice

1 T. chopped cilantro

1 T. chopped basil

1 chopped garlic clove

Salt & Pepper

Caramel Apple French Toast

So…. I owe you all an apology for the delay in my posts.  I have been very busy preparing material, recipes, and photos for crumb duster adventures.  Today you all get to see my progress.

This weekend, Josh and I took a great little day trip to The Berry Patch right outside of Nevada, IA.  This time of year The Berry Patch has a nice assortment of apple trees and two huge pumpkin patches.  We were in search of the Chieftan apple, a variety that was developed at Iowa State University.  After picking a nice big basket we tasted them for the first time and whoa are they delicious! They have a nice crisp skin and are very crunchy.  Their flavor is sweet but has a little sour bite that makes them very dynamic. In addition to our bushel of apples, we found two cute pumpkins and butternut squash.  Since our trip I have been very busy making all sorts of apple and squash treats.

I have included a recipe for Multi-Grain Caramel Apple French Toast which was a huge hit with Josh and I am sure would impress a crowd!

Multi-Grain Caramel Apple French Toast:

6 slices multi-grain bread, slightly stale

3 eggs

1 tsp. vanilla extract

1 T. brown sugar

1 tsp. cinnamon

1 t. nutmeg

1 t. pumpkin pie spice

Combine eggs, extract, and spices.  When ready to cook French toast, soak each slice of multi-grain bread in egg batter for a couple seconds on each side.  When properly soaked transfer bread to a heated (medium heat) griddle. Cook on both sides until golden brown.

Serve topped with Caramel Apple Syrup

Recipe for the Caramel Apple Syrup:

½ C. pure maple syrup

1 med. Chieftan or Honeycrisp apple, skin on and thinly sliced

1 T. caramel sauce

1 tsp. cinnamon

1 tsp. nutmeg

1 tsp. pumpkin pie spice

Simmer all ingredients together in a small sauce pan until apples have softened and syrup is slightly thicker.

homemade salad dressing discovery

I have made the most wonderful homemade salad dressing discovery! For those of us trying to be healthy… salads are a common staple in our diet.  However, salad dressing (if you aren’t careful) can pack on the extra calories.  I have found a way to make creamy homemade dressing without the cream or buttermilk, and for that matter the dairy at all.

I start with a base of whisked together vinegar (any kind that fits your flavor profile) and good quality extra virgin olive oil.

I then add a flavor booster or two: Dijon mustard, whole grain mustard, sriracha for spice, pureed olives, garlic paste, tomato paste, fresh squeezed lemon, creamy peanut butter for an oriental twist, etc. – Whisk

If you want you can now add herbs, too: I like fresh thyme, basil, or cilantro. My favorite dried herbs would be the combo: Herbs de Provence.

Don’t forget to salt and pepper, too.

AND NOW FOR THE DISCOVERY!……. drum roll please……

Whisk in a tablespoon or two of homemade or prepared HUMMUS! You will be amazed by the creamy silky texture the hummus will add to your otherwise ordinary vinaigrette.  Also, since prepared hummus comes in all kinds of flavors these days…. you can experiment with different combinations of flavors.

The combination I came up with last night was:

  • Quality balsamic vinegar
  • Quality extra virgin olive oil
  • Dijon mustard
  • Dried oregano
  • Red wine
  • Greek Style Athenos prepared hummus
  • Salt & fresh ground pepper

Rachael Ray Reconsidered

Though I don’t often watch, read, or pay much attention to Rachael Ray and her 3o minute meals… I am beginning to reconsider.  As someone who enjoys cooking complex and time consuming meals I am not exactly her demographic, and I understand this. However, I have realized that her new episodes and some of the food she is producing has become more challenging both in technique and flavor. I am not claiming that the recipe I am showcasing is exactly “challenging” but it is not what I expect from Rachael Ray.  I made this slightly adapted sesame soba noodle salad recipe for a quick lunch with Josh last week.  I like that the soba noodles are made of buckwheat for added nutrients.  The adaptations I made were also to add a bit more color, nutrition, and interest. This salad is absolutely delicious and I am sharing it partly because it is so easy for a quick lunch and would keep well in the refrigerator for a couple days.

Sesame Soba Noodle Salad- Adapted from Rachael Ray

Ingredients:

Salt
1/2 pound soba, or whole-wheat linguine or spaghetti
1/4 cup honey
1/4 cup ponzu (citrus soy sauce)
2 tablespoons rice vinegar
2 teaspoons toasted sesame oil
One 2-inch piece fresh ginger, peeled and grated
1 large clove garlic, grated or finely chopped
1/3 cup olive oil or vegetable oil
1 cup frozen shelled edamame, thawed
2 large carrots, shredded into nice ribbons
1 small bunch scallions, very thinly sliced on an angle

1 cup thinly shredded red cabbage
3 tablespoons mixed black sesame seeds and toasted white sesame seeds

Crushed peanuts- enough to garnish. (optional)- Josh discovered this wonderful addition!

Directions:

Bring a pot of salted water to a boil. Add the soba and cook until al dente. Drain.

Meanwhile, combine the honey, ponzu, vinegar, sesame oil, ginger and garlic in a large bowl. Whisk in the olive oil. Add the edamame, carrots, scallions, cabbage and soba to the bowl and toss to combine. Garnish with the sesame seeds and optional crushed peanuts for great texture.

Supposed to serve 4. (Definitely only served Josh and myself…. we ate it ALL!)

This salad is great because it can be served warm, room temp, or cold! I really love it cold after the flavors have had an opportunity to meld in the refrigerator for a couple hours.

Commence blog NOW!

Enjoying gelato in Caen, France

Welcome to crumbdusteradventures! Thanks to my two wonderful (& hilarious) friends, Alyse & Ann-Charlotte, I now have the guts to begin what I hope will be a great culinary adventure.  This idea was born over a couple of good glasses of wine and an insult.  A couple of days before our girls night, I had told Alyse that I was uploading an album of food photographs to facebook. She thought this was comical and a bit nerdy.  While discussing this event, both friends replied that a blog would be a perfect place to share this hobby of mine.  I owe them a huge thanks for helping me gain the motivation and of course the quirky blog title. Love you guys… may we share many more bottles of wine!

Thanks to these ladies, this blog will serve as a place to organize my ideas, thoughts, and feelings on anything restaurant or food oriented.

To eating well! :: Tu bene comendere!

XO- Lib